#export files from salesforce
Explore tagged Tumblr posts
Visit Tumblr Blog
Explore Tumblr blogs with no restrictions, modern design and the best experience.
Last Seen Tumblr Blogs


Fun Fact
69% of Tumblr users are millennials.
Text
Effortlessly Mass Export Files from Salesforce with Sastorm Software

Effortlessly mass export files from Salesforce with Sastorm Software. Our solution simplifies bulk data transfers, ensuring efficiency and accuracy. Quickly set up your export, handle large volumes of files seamlessly, and enjoy secure, encrypted data transfers. Streamline your workflow and enhance productivity with our user-friendly tools.
0 notes
Text
Unlocking Sales Leads: How LinkedIn Data Extraction Tool Works with Sales Navigator Scraper – Powered by Data Reclaimer
In the digital era, sales success is no longer about cold calls and guesswork — it’s about smart data, targeted outreach, and precision prospecting. That’s where LinkedIn Sales Navigator and modern scraping tools like Sales Navigator Scraper come into play. Designed to enhance B2B lead generation, these tools extract actionable business intelligence directly from the world’s largest professional network. But how does a LinkedIn data extraction tool work? And what makes tools like those offered by Data Reclaimer a game-changer for sales professionals?
Let’s explore.
What Is LinkedIn Sales Navigator?
LinkedIn Sales Navigator is a premium tool provided by LinkedIn, tailored for sales teams and B2B marketers. It offers advanced search filters, lead recommendations, CRM integrations, and insights into buyer intent — all aimed at helping users connect with the right decision-makers.
However, manually collecting and organizing data from Sales Navigator can be time-consuming and inefficient. This is where data extraction tools or Sales Navigator scrapers come in, automating the process of pulling valuable data from LinkedIn profiles, company pages, and lead lists.
How LinkedIn Data Extraction Tools Work
When we ask "How LinkedIn Data Extraction Tool Works?", the answer lies in a combination of intelligent web scraping, automation frameworks, and ethical data handling practices.
1. User Authentication & Input
First, the user logs into their LinkedIn account — typically through Sales Navigator — and defines search parameters such as industry, location, job title, company size, or keywords.
2. Automated Crawling
Once parameters are set, the tool initiates an automated crawl through the search results. Using browser automation (often through headless browsers like Puppeteer or Selenium), it navigates LinkedIn just like a human would — scrolling, clicking, and viewing profiles.
3. Data Extraction
The scraper extracts public or semi-public information such as:
Full Name
Job Title
Company Name
Location
LinkedIn Profile URL
Contact info (if available)
Industry and seniority level
Connection level (1st, 2nd, 3rd)
4. Data Structuring
After extraction, the data is parsed and organized into a clean format — usually a CSV or JSON file — for easy import into CRMs like HubSpot, Salesforce, or marketing automation platforms.
5. Export and Integration
Finally, users can download the dataset or directly sync it to their sales stack, ready for outreach, segmentation, or analysis.
Why Use Sales Navigator Scraper by Data Reclaimer?
Data Reclaimer offers a cutting-edge Sales Navigator Scraper designed to be user-friendly, accurate, and compliant with best practices. Here’s why it stands out:
✅ High Accuracy & Speed
Unlike basic scrapers that miss key data points or get blocked, Data Reclaimer’s tool uses advanced logic to mimic human interaction, ensuring minimal detection and high-quality results.
✅ Custom Filters & Targeting
Pull data based on highly specific LinkedIn Sales Navigator filters such as seniority, department, activity, and more — allowing for razor-sharp targeting.
✅ Real-Time Data Updates
Stay ahead of outdated contact lists. The tool extracts real-time profile data, ensuring your leads are current and relevant.
✅ GDPR-Aware Extraction
Data Reclaimer ensures its scraping tools align with ethical and legal standards, including GDPR compliance by focusing only on publicly accessible data.
✅ Scalable for Agencies and Teams
Whether you're a solo marketer or part of a large agency, the Sales Navigator Scraper supports bulk extraction for large-scale lead generation.
Use Cases for LinkedIn Data Extraction Tools
From recruiters and B2B marketers to SDRs and startup founders, many professionals benefit from LinkedIn data scraping:
Lead Generation: Build targeted B2B lead lists quickly without manual searching.
Competitor Research: Analyze hiring trends, employee roles, or client networks.
Market Segmentation: Understand demographics within an industry or region.
Recruitment: Identify potential candidates based on roles and skills.
Corporate Intelligence: Map organizational charts and influencer hierarchies.
Ethical Considerations & Best Practices
Using a LinkedIn data extraction tool should always follow responsible use practices. Data Reclaimer advises:
Avoid scraping excessive data that may violate LinkedIn's terms of use.
Only extract information that is publicly available.
Use scraped data for B2B networking and not for spam or harassment.
Clearly disclose how data will be used when reaching out to prospects.
Respect for data privacy not only ensures compliance but also builds trust with your leads.
Tips for Maximizing Sales Navigator Scraper Efficiency
Refine Your Filters: The more specific your Sales Navigator search, the cleaner and more targeted your data output.
Use Proxy Rotation: To avoid IP blocks, consider rotating proxies or using a tool that automates this for you.
Limit Daily Requests: Over-scraping can trigger LinkedIn’s anti-bot systems. Stick to daily limits suggested by your scraper provider.
Enrich and Verify Data: Use email verification tools or enrichment platforms to validate and enhance extracted data.
Integrate with Your CRM: Automate lead nurturing by syncing extracted leads into your CRM system for immediate follow-up.
Conclusion: Sales Prospecting at Scale, the Smart Way
In today’s hyper-competitive B2B landscape, the ability to access high-quality, targeted leads can set you apart from the competition. Understanding how LinkedIn data extraction tools work, especially through powerful solutions like the Sales Navigator Scraper by Data Reclaimer, empowers sales teams to focus on closing deals instead of chasing contact information.
From startups to enterprise sales departments and B2B agencies, tools like these are not just about automation — they’re about intelligence, efficiency, and scalability.
1 note
·
View note
Text
Batch Address Validation Tool and Bulk Address Verification Software
When businesses manage thousands—or millions—of addresses, validating each one manually is impractical. That’s where batch address validation tools and bulk address verification software come into play. These solutions streamline address cleansing by processing large datasets efficiently and accurately.

What Is Batch Address Validation?
Batch address validation refers to the automated process of validating multiple addresses in a single operation. It typically involves uploading a file (CSV, Excel, or database) containing addresses, which the software then checks, corrects, formats, and appends with geolocation or delivery metadata.
Who Needs Bulk Address Verification?
Any organization managing high volumes of contact data can benefit, including:
Ecommerce retailers shipping to customers worldwide.
Financial institutions verifying client data.
Healthcare providers maintaining accurate patient records.
Government agencies validating census or mailing records.
Marketing agencies cleaning up lists for campaigns.
Key Benefits of Bulk Address Verification Software
1. Improved Deliverability
Clean data ensures your packages, documents, and marketing mailers reach the right person at the right location.
2. Cost Efficiency
Avoiding undeliverable mail means reduced waste in printing, postage, and customer service follow-up.
3. Database Accuracy
Maintaining accurate addresses in your CRM, ERP, or mailing list helps improve segmentation and customer engagement.
4. Time Savings
What would take weeks manually can now be done in minutes or hours with bulk processing tools.
5. Regulatory Compliance
Meet legal and industry data standards more easily with clean, validated address data.
Features to Expect from a Batch Address Validation Tool
When evaluating providers, check for the following capabilities:
Large File Upload Support: Ability to handle millions of records.
Address Standardization: Correcting misspellings, filling in missing components, and formatting according to regional norms.
Geocoding Integration: Assigning latitude and longitude to each validated address.
Duplicate Detection & Merging: Identifying and consolidating redundant entries.
Reporting and Audit Trails: For compliance and quality assurance.
Popular Batch Address Verification Tools
Here are leading tools in 2025:
1. Melissa Global Address Verification
Features: Supports batch and real-time validation, international formatting, and geocoding.
Integration: Works with Excel, SQL Server, and Salesforce.
2. Loqate Bulk Cleanse
Strengths: Excel-friendly UI, supports uploads via drag-and-drop, and instant insights.
Ideal For: Businesses looking to clean customer databases or mailing lists quickly.
3. Smarty Bulk Address Validation
Highlights: Fast processing, intuitive dashboard, and competitive pricing.
Free Tier: Great for small businesses or pilot projects.
4. Experian Bulk Address Verification
Capabilities: Cleans large datasets with regional postal expertise.
Notable Use Case: Utility companies and financial services.
5. Data Ladder’s DataMatch Enterprise
Advanced Matching: Beyond address validation, it detects data anomalies and fuzzy matches.
Use Case: Enterprise-grade data cleansing for mergers or CRM migrations.
How to Use Bulk Address Verification Software
Using batch tools is typically simple and follows this flow:
Upload Your File: Use CSV, Excel, or database export.
Map Fields: Match your columns with the tool’s required address fields.
Validate & Clean: The software standardizes, verifies, and corrects addresses.
Download Results: Export a clean file with enriched metadata (ZIP+4, geocode, etc.)
Import Back: Upload your clean list into your CRM or ERP system.
Integration Options for Bulk Address Validation
Many vendors offer APIs or direct plugins for:
Salesforce
Microsoft Dynamics
HubSpot
Oracle and SAP
Google Sheets
MySQL / PostgreSQL / SQL Server
Whether you're cleaning one-time datasets or automating ongoing data ingestion, integration capabilities matter.
SEO Use Cases: Why Batch Address Tools Help Digital Businesses
In the context of SEO and digital marketing, bulk address validation plays a key role:
Improved Local SEO Accuracy: Accurate NAP (Name, Address, Phone) data ensures consistent local listings and better visibility.
Better Audience Segmentation: Clean data supports targeted, geo-focused marketing.
Lower Email Bounce Rates: Often tied to postal address quality in cross-channel databases.
Final Thoughts
Batch address validation tools and bulk verification software are essential for cleaning and maintaining large datasets. These platforms save time, cut costs, and improve delivery accuracy—making them indispensable for logistics, ecommerce, and CRM management.
Key Takeaways
Use international address validation to expand globally without delivery errors.
Choose batch tools to clean large datasets in one go.
Prioritize features like postal certification, coverage, geocoding, and compliance.
Integrate with your business tools for automated, real-time validation.
Whether you're validating a single international address or millions in a database, the right tools empower your operations and increase your brand's reliability across borders.
youtube
SITES WE SUPPORT
Validate Address With API – Wix
0 notes
Text
INTEGRATION SOFTWARE
In today’s fast-paced business environment, integrating accounting software like Tally with other business tools is essential for efficiency and accuracy. If you’re looking for the best Tally integration software to streamline operations and boost productivity, you’ve come to the right place.
At Bizmate, we understand the importance of seamless integrations to enhance workflow automation, reduce manual errors, and improve financial reporting. In this article, we’ll explore the top Tally integration software solutions that can help your business grow while optimizing accounting processes.
Why Do You Need Tally Integration Software?
Tally is a powerful accounting tool, but integrating it with other business applications can unlock its full potential. Here’s why Tally integration is crucial:
✅ Automates Data Entry – Eliminates manual data transfer between systems. ✅ Reduces Errors – Minimizes human mistakes in financial records. ✅ Improves Efficiency – Syncs sales, inventory, payroll, and CRM data in real time. ✅ Enhances Reporting – Generates consolidated reports for better decision-making.
Now, let’s dive into the best Tally integration software available today.
Top 5 Tally Integration Software for Businesses
1. Biz Analyst
Best for: Small & medium businesses (SMBs) Key Features:
Syncs Tally data with mobile apps for on-the-go access.
Real-time sales and inventory tracking.
Financial reporting and analytics.
Why Choose Biz Analyst? Biz Analyst is a user-friendly app that helps business owners access Tally data remotely, making it ideal for sales teams and managers who need instant financial insights.
2. TallyPrime with E-Invoicing Integration
Best for: GST-compliant businesses in India Key Features:
Direct e-invoice generation from Tally.
Auto-sync with the GST portal.
Seamless ERP and CRM integration.
Why Choose TallyPrime? If your business deals with GST filing, TallyPrime’s built-in e-invoicing feature ensures compliance while reducing manual work.
3. Zapier for Tally
Best for: Automating workflows across apps Key Features:
Connects Tally with 1,000+ apps (e.g., Shopify, QuickBooks, Gmail).
Triggers automated actions (e.g., sending invoices via email).
No coding required.
Why Choose Zapier? Zapier is perfect for businesses using multiple tools and needing automated workflows without complex setups.
4. Tally.ERP 9 with Salesforce Integration
Best for: CRM and accounting synchronization Key Features:
Syncs customer data between Tally and Salesforce.
Automates invoice generation from sales orders.
Improves sales and accounting alignment.
Why Choose Salesforce Integration? If your business relies on CRM for sales, integrating Salesforce with Tally ensures seamless data flow between departments.
5. QuickBooks Tally Connector
Best for: Businesses using both Tally & QuickBooks Key Features:
Imports/export data between Tally and QuickBooks.
Maintains consistency across accounting platforms.
Reduces duplicate entries.
Why Choose QuickBooks Tally Connector? If you operate globally and use QuickBooks for international accounting, this integration keeps your books aligned.
How to Choose the Right Tally Integration Software?
Before selecting a Tally integration tool, consider:
🔹 Business Needs – Do you need CRM, e-commerce, or inventory sync? 🔹 Budget – Some tools offer free plans, while others require subscriptions. 🔹 Ease of Use – Look for no-code solutions if you lack technical expertise. 🔹 Scalability – Will the software grow with your business?
Conclusion
Integrating Tally with the right software can save time, reduce errors, and improve business efficiency. Whether you need mobile access (Biz Analyst), automation (Zapier), or CRM sync (Salesforce), there’s a perfect Tally integration tool for your business.
At Bizmate, we help businesses optimize their accounting processes with smart software solutions. Need help choosing the best Tally integration for your company? Contact us today!
By leveraging these tools, you can enhance productivity, streamline operations, and grow your business faster.
0 notes
Text
How to Build Custom Apps on Salesforce Using Lightning Web Components (LWC)

Salesforce is a leading platform in cloud-based customer relationship management (CRM), and one of its standout features is the ability to create custom apps tailored to an organization's specific needs. With the introduction of Lightning Web Components (LWC), Salesforce developers can now build faster, more efficient, and more powerful custom applications that integrate seamlessly with the Salesforce ecosystem.
In this blog, we’ll walk you through the process of building custom apps on Salesforce using Lightning Web Components.
What Are Lightning Web Components (LWC)?
Before diving into the development process, let’s briefly explain what Lightning Web Components are. LWC is a modern, standards-based JavaScript framework built on web components, enabling developers to build reusable and customizable components for Salesforce apps. It is faster and more efficient than its predecessor, Aura components, because it is built on native browser features and embraces modern web standards.
Why Use LWC for Custom Apps on Salesforce?
Performance: LWC is optimized for speed. It delivers a faster runtime and improved loading times compared to Aura components.
Reusability: Components can be reused across different apps, enhancing consistency and productivity.
Standardization: Since LWC is built on web standards, it makes use of popular technologies like JavaScript, HTML, and CSS, which makes it easier for developers to work with.
Ease of Integration: LWC components integrate effortlessly with Salesforce's powerful features such as Apex, Visualforce, and Lightning App Builder.
Steps to Build Custom Apps Using LWC
1. Set Up Your Salesforce Developer Environment
Before you begin building, you’ll need a Salesforce Developer Edition or a Salesforce org where you can develop and test your apps.
Create a Salesforce Developer Edition Account: You can sign up for a free Developer Edition from Salesforce’s website.
Install Salesforce CLI: The Salesforce CLI (Command Line Interface) helps you to interact with your Salesforce org and retrieve metadata, deploy changes, and execute tests.
Set Up VS Code with Salesforce Extensions: Visual Studio Code is the most commonly used editor for LWC development, and Salesforce provides extensions for VS Code that offer helpful features like code completion and syntax highlighting.
2. Create a New Lightning Web Component
Once your development environment is set up, you’re ready to create your first LWC component.
Open VS Code and create a new Salesforce project using the SFDX: Create Project command.
Create a Lightning Web Component by using the SFDX: Create Lightning Web Component command and entering the name of your component.
Your component’s files will be generated. This includes an HTML file (for markup), a JavaScript file (for logic), and a CSS file (for styling).
Here’s an example of a simple LWC component:
HTML (template):
html
CopyEdit
<template> <lightning-card title="Welcome to LWC!" icon-name="custom:custom63"> <div class="slds-p-around_medium"> <p>Hello, welcome to building custom apps using Lightning Web Components!</p> </div> </lightning-card> </template>
JavaScript (logic):
javascript
CopyEdit
import { LightningElement } from 'lwc'; export default class WelcomeMessage extends LightningElement {}
3. Customize Your LWC Components
Now that your basic LWC component is in place, you can start customizing it. Some common customizations include:
Adding Dynamic Data: You can use Salesforce data by querying records through Apex controllers or the Lightning Data Service.
Handling Events: LWC allows you to define custom events or handle standard events like button clicks, form submissions, etc.
Styling: You can use Salesforce’s Lightning Design System (SLDS) or custom CSS to style your components according to your branding.
Example of adding dynamic data (like displaying a user’s name):
javascript
CopyEdit
import { LightningElement, wire } from 'lwc'; import getUserName from '@salesforce/apex/UserController.getUserName'; export default class DisplayUserName extends LightningElement { userName; @wire(getUserName) wiredUserName({ error, data }) { if (data) { this.userName = data; } else if (error) { console.error(error); } } }
4. Deploy and Test Your Component
Once you’ve created your components, it’s time to deploy them to your Salesforce org and test them.
Deploy to Salesforce Org: You can deploy your component using the Salesforce CLI by running SFDX: Deploy Source to Org from VS Code.
Testing: You can add your LWC component to a Lightning page using the Lightning App Builder and test its functionality directly in the Salesforce UI.
5. Create a Custom App with Your Components
Once your custom components are developed and tested, you can integrate them into a full custom app.
Use the Lightning App Builder: The Lightning App Builder allows you to create custom apps by dragging and dropping your LWC components onto a page.
Set Permissions and Sharing: Ensure that the right users have access to the custom app by configuring user permissions, profiles, and sharing settings.
6. Iterate and Improve
Once your app is live, collect user feedback and iteratively improve the app. Salesforce offers various tools like debugging, performance monitoring, and error tracking to help you maintain and enhance your app.
Best Practices for Building Custom Apps with LWC
Component Modularity: Break down your app into smaller, reusable components to improve maintainability.
Optimize for Performance: Avoid heavy processing on the client-side and use server-side Apex logic where appropriate.
Use Lightning Data Service: It simplifies data management by handling CRUD operations without the need for Apex code.
Follow Salesforce’s Security Guidelines: Ensure that your app follows Salesforce’s security best practices, like field-level security and sharing rules.
Conclusion
Building custom apps on Salesforce using Lightning Web Components is an effective way to harness the full power of the Salesforce platform. With LWC, developers can create high-performance, dynamic, and responsive apps that integrate seamlessly with Salesforce’s cloud services. By following best practices and leveraging Salesforce’s tools, you can build applications that drive business efficiency and enhance user experience.
If you're interested in building custom Salesforce applications, now is the perfect time to dive into Lightning Web Components and start bringing your ideas to life!
0 notes
Text
Migrating to Salesforce: 8 Expert Tips for Better Transition
Though migrating to Salesforce for customer relationship management may seem a herculean task, it is not so in reality. Migrating to Salesforce requires meticulous planning and prompt execution. Salesforce offers solutions that help a lot with streamlining workflows, gaining insights into customer data for analyzing trends, and automating cumbersome, tedious, and mundane tasks.
Table of Contents
Data Detox and Decluttering before migrating to Salesforce:
Assemble Your A-Team before migrating to Salesforce:
Data Extraction:
Data Transformation:
Data Validation:
Customization:
Populate templates:
Addressing Management Matters before migrating to Salesforce:
https://blog.almamate.in/wp-content/uploads/2024/07/salesforce-migration-1.jpg
Before clicking on that ‘migrate’ button, it is always advisable to map out one’s strategy. Following are a few key factors to consider before taking the plunge and migrating to Salesforce:
Data Detox and Decluttering before migrating to Salesforce:
It is a good practice to figure out how redundant and duplicate data must be removed before migrating to Salesforce. Only important data that is worth retaining should remain in the database which is to be migrated using Salesforce. Identify the critical customer, lead, and opportunity details of your organization’s database– this is the essence of successfully migrating to Salesforce. Think of it as cleaning out your attic. Formatting inconsistencies are also to be rooted out. Backing up data before starting the detox process is a good practice and is of immense importance. Backed-up data can be reinstated if something goes wrong while migrating to Salesforce.
Assemble Your A-Team before migrating to Salesforce:
Recruit and put together a team of star performers from the sales, IT, and data management verticals of your organization. Their combined expertise will ensure a smooth installation of (and transition to) Salesforce. Equip your teams with the knowledge they need to leverage the utility of Salesforce. Invest in training programs and resources. This is crucial for user buy-in.
Data Extraction:
Tools like Salesforce’s Data Loader will help you extract the necessary & relevant data from your computer/server/cloud. Classify and categorize the data you want to migrate. Choose the Objects that are to be migrated. Decide whether to migrate only the Contact information from each Account or to only migrate the Account information from a particular division.
Data Transformation:
Not all data will fit perfectly into Salesforce’s structure. The key to smooth sailing in the Salesforce ecosystem is meticulous mapping, formatting, and cleaning up of your existing data as and when decisions to transform data are made.
Data Validation:
While validating the migrated data, it is a must to detect flaws, inconsistencies, and discrepancies before problems in the reports and dashboards are created. Create custom reports to validate record counts and provide an overall snapshot of migration. Then, spot-check the data. This involves doing pilot testing by migrating small data sets before a full-scale migration. Review exception reports to see which data was not migrated.
Customization:
Tailor Salesforce to fit your team’s unique needs and workflows. This will make the platform feel familiar and more comfortable to work with. Create templates for the data. Create an Excel template for each Object using data export from Data Loader (use the export file as your template). Since Objects have mandatory relationships that dictate the order of data migration, identify the required fields for each Object. Always migrate Users first, then Accounts, followed by migration of Opportunities.
Populate templates:
Review your data before populating it in the template. Load one record, check the results, and then load all the remaining records. Prepare the destination org. Consider creating custom fields to store any legacy ID information. You can also assign the custom field the “External ID” attribute so it may be indexed. This will help maintain relationships and help you build custom reports for data validation. Create custom fields to store data contained in non-standard fields in the old organization. Consider this: if the old organization (source from where data is to be migrated) stored ‘Home Phone’ for your ‘Users’, consider creating that same custom field in the new Organization (destination where data is to be transferred) too.
Addressing Management Matters before migrating to Salesforce:
A successful migration is more than just about using the appropriate technology for migration. Prepare your team for the switch and address any anxieties they might have, so the team members may not face any issues while acclimatizing to the newly formatted/organized data structures. Remember, changes made to a system that the employees have been using for a long time can be petrifying for them, so open communication is key to preparing your team for the usage of the ever-evolving Salesforce features.
By carefully planning early, tackling the technical aspects with precision, and prioritizing user adoption, one can ensure a smooth data transition and unlock the full potential of Salesforce, a powerful CRM platform. Salesforce offers a plethora of migration resources and has many certified partners to assist clients with data migration. Embracing the power of Salesforce can significantly elevate your business operations, driving growth and fostering innovation.
https://www.youtube.com/embed/dNqipJxEigo?feature=oembedEnroll in our job-oriented Salesforce Training Programs to improve your career prospects!
Ready to make the most out of your Salesforce migration journey? AlmaMate, a premier Salesforce training center in Noida, is here to help you every step of the way. Our Salesforce certification courses, including Salesforce Developer Training and Salesforce Admin Training, are designed to equip your teams with the skills they need for a seamless transition. We offer the best Salesforce Training in Noida, and Salesforce Online Training in Delhi NCR, ensuring that you receive top-notch education no matter where you are. Empower your team with AlmaMate’s expert guidance and unlock the full potential of Salesforce! Contact us today to get started! Visit our website!
Disclaimer**: The images placed on this web page have been sourced from pexels.com.
0 notes
Text
Beyond YYYY-MM-DD: A Comprehensive Look at Salesforce Data Loader Date Format Options

Table of Contents
Introduction
Understanding Salesforce Data Loader
Significance of Correct Date Formats
Default Date Format: YYYY-MM-DD
Other Date Format Options
Configuring Date Formats in Salesforce Data Loader
Best Practices for Using Date Formats
Handling Time Zones
Common Challenges and Solutions
Testing Date Formats
Automating Date Format Configuration
Advanced Date Format Customizations
Integrating Salesforce Data Loader with Other Tools
Maintaining Data Integrity
Tips for Preparing Your Files for Salesforce Data Loader
Final Words
FAQs
Salesforce is all about data management. It allows users to record, store, track, and analyze specific data sets that belong to customers catered by an organization and the organization itself. The data stored in specific Salesforce objects helps users provide personalized services to their customers and obtain valuable insights about various business processes.
This makes it important for every Salesforce user to manage their database with extreme precision and accuracy. You cannot afford to load incorrect or insufficient data into your systems as it may result in mismanagement of processes and faulty communication.
Understanding Salesforce Data Loader
Salesforce Data Loader is a data management tool for Salesforce users that helps them import and export data in bulk. It provides functions like inserting, updating, deleting, and exporting Salesforce records.
For importing data, Data Loader reads, extracts, and loads data either from CSV (comma-separated values) files or from a database connection. For exporting data, the tool outputs CSV files to the specified location.
Salesforce Data Loader can be used in two ways – through the user interface and the command line. The user interface is interactive for specifying parameters, CSV files for import/export, and field mappings. The command line specifies configuration, mappings, data sources, and actions in files for automated data processing.
Significance of Correct Date Formats
Correct date formats are crucial in data accuracy. Incorrect date formats can lead to data inconsistency and misinterpretation. Proper date formats ensure data integrity and relevance over time.
Default Date Format: YYYY-MM-DD
The default date format in Salesforce Data Loader is YYYY-MM-DD. This format is straightforward and prevents confusion, ensuring consistency across records.
Other Date Format Options
Salesforce Data Loader supports various date formats, including:
MM/DD/YYYY (e.g., 08/12/2019)
DD/MM/YYYY (e.g., 14/11/2019)
YYYY/MM/DD (e.g., 2020/12/06)
Military Time Zones – MM/DD/YYYYThh:mm.mmmZ (e.g., 12-05-2019T12:04:12.000Z)
3 Letters Time Zones plus Offset – MM/DD/YYYYThh:mm.mmmXXX+hh(e.g., 04/12/2019T12:04:12.000GMT+03:00)
3 Letters Time Zones – MM/DD/YYYYThh:mm.mmmXXX (e.g., 05/22/2019T12:04:12.000GMT)
3 Letters Time Zones – YYYY-MM-DDThh:mm.mmmXXX (e.g., 2019-11-09T12:04:12.000GMT)
Configuring Date Formats in Salesforce Data Loader

To change your Salesforce Data Loader date format, go to Settings and select “Date/Time” for setting your date format and time zone.
Best Practices for Using Date Formats
Choose the right format: Select the format that best suits your business needs.
Ensure consistency: Maintain the same format across all records.
Test formats: Validate date formats before data migration.
Handling Time Zones
Time zones play a significant role in date formatting. Configure time zones in Salesforce Data Loader to ensure date accuracy across different regions.
Common Challenges and Solutions
Incorrect Date Imports: Sometimes, Data Loader imports dates incorrectly by converting them to GMT. Prevent this by setting the correct time zone and using the native time zone in CSV files.
Testing Date Formats
Test and validate date formats before data migration using tools and methods to ensure data accuracy.
Automating Date Format Configuration
Automate date format settings for large-scale data migrations to save time and reduce errors.
Advanced Date Format Customizations
Implement custom date formats in Salesforce Data Loader for more specific requirements. Customize formats according to business needs.
Integrating Salesforce Data Loader with Other Tools
Ensure seamless integration of date formats with other data management tools for better compatibility and efficiency.
Maintaining Data Integrity
Maintain data integrity with regular audits and checks to ensure the accuracy and consistency of date formats in Salesforce Data Loader.
Tips for Preparing Your Files for Salesforce Data Loader
Ensure CSV format: Convert files to CSV before uploading.
Check for corruption: Open and validate CSV files after conversion.
Avoid empty columns: Ensure no empty columns or duplicate headers.
Populate required fields: Ensure all system-required fields are populated.
Use conditional formatting: Highlight duplicate values in Excel before conversion.
Reapply formatting: Apply and save formatting in CSV files before importing.
Format phone numbers: Use Excel’s phone number format for phone and fax columns.
Validate email addresses: Ensure all email addresses are correctly formatted.
Remove currency symbols: Get rid of symbols and commas in number and currency columns.
Use correct checkbox values: Use “1” or TRUE for checked and “0” or FALSE for unchecked cells.
No multiple columns into one field: Data Loader does not support importing multiple columns into a single Salesforce field.
Address field support: Check the Salesforce Help topic for importing multiple street addresses.
Final Words
Data management in Salesforce should never be taken lightly. By considering these aspects before loading your data into Salesforce, Data Loader will help you sail through seamlessly. Techila Global Services provides the best solutions for Salesforce Data Loader Date Format.
FAQs
What is Salesforce Data Loader? Salesforce Data Loader is a tool for bulk data import and export in Salesforce.
What date formats does Salesforce Data Loader support? It supports formats like MM/DD/YYYY, DD/MM/YYYY, YYYY/MM/DD, and more.
How can I change the date format in Salesforce Data Loader? Go to Settings and select “Date/Time” for setting your date format and time zone.
Why are my date fields importing incorrectly? Data Loader may convert dates to GMT; set the correct time zone and use the native time zone in CSV files.
What are the best practices for using date formats in Data Loader? Choose the right format, ensure consistency, and test formats before data migration
1 note
·
View note
Text
Tableau Made Simple: Beginner's Tutorial for Quick Learning
Welcome to Tableau Made Simple! In this beginner's tutorial, we'll take you through the essential steps to get started with Tableau. Whether you're new to data visualization or looking to enhance your skills, this guide will help you navigate Tableau's powerful features in easy-to-understand language. By the end of this tutorial, you'll be equipped to create stunning visualizations and gain valuable insights from your data.
1. Introduction to Tableau
Let's begin with the basics. Tableau is a leading data visualization tool that allows users to create interactive and shareable dashboards. It enables users to connect to various data sources, visualize data in different formats, and analyze trends and patterns efficiently. Whether you're working with spreadsheets, databases, or cloud services, Tableau provides a user-friendly interface to explore and present your data effectively.
2. Installing Tableau Desktop
To start using Tableau, you'll need to install Tableau Desktop, the primary application for creating visualizations. You can download a free trial version from the Tableau website and follow the installation instructions. Once installed, launch Tableau Desktop to begin your data visualization journey.
3. Connecting to Data Sources
Tableau allows you to connect to a wide range of data sources, including Excel files, databases like SQL Server and Oracle, cloud services like Google Analytics and Salesforce, and more. To connect to your data source, simply click on the "Connect" option in Tableau Desktop and choose the appropriate connection type. Follow the prompts to establish a connection and import your data into Tableau.
4. Building Your First Visualization
Now that you've connected to your data source, it's time to create your first visualization. Tableau offers a drag-and-drop interface, making it easy to build visualizations without writing any code. Start by selecting the fields you want to include in your visualization and drag them onto the canvas. Tableau will automatically generate a suitable visualization type based on your data, such as a bar chart, line chart, or scatter plot.
5. Customizing Visualizations
Tableau provides extensive customization options to tailor your visualizations according to your preferences. You can adjust colors, fonts, labels, and other properties to enhance the clarity and aesthetics of your visualizations. Experiment with different chart types and formatting options to find the best representation of your data.
6. Adding Interactivity
One of Tableau's key strengths is its interactive capabilities. You can add interactivity to your visualizations by creating filters, parameters, and actions. Filters allow users to dynamically explore data by selecting specific criteria, while parameters enable users to control aspects of the visualization, such as date ranges or categories. Actions enable users to interact with multiple visualizations simultaneously, facilitating deeper insights and analysis.
7. Creating Dashboards
Dashboards are collections of visualizations arranged on a single screen for comprehensive data analysis. Tableau allows you to create interactive dashboards by combining multiple visualizations, filters, and other components. To create a dashboard, simply drag and drop visualizations onto the dashboard canvas and arrange them as desired. You can also add titles, text boxes, and images to provide context and insights.
8. Sharing Your Work
Once you've created your visualizations and dashboards, you can easily share them with others. Tableau offers various sharing options, including publishing to Tableau Server or Tableau Online, exporting as an image or PDF, or embedding in a webpage or presentation. Sharing your work allows you to collaborate with colleagues, stakeholders, and clients, enabling informed decision-making based on data-driven insights.
9. Learning Resources and Community Support
As you continue your Tableau journey, take advantage of the abundant learning resources and community support available. Tableau offers free training videos, tutorials, and documentation on its website to help you master the tool. Additionally, join the Tableau Community to connect with fellow users, ask questions, and share your experiences. The Tableau Community is a valuable resource for learning new techniques, troubleshooting issues, and staying updated on the latest developments in data visualization.
In conclusion, Tableau is a powerful tool for data visualization and analysis, and this beginner's tutorial has provided you with the foundational knowledge to get started. With its intuitive interface, extensive customization options, and interactive capabilities, Tableau empowers users to create insightful visualizations and drive data-driven decision-making. So why wait? Dive into Tableau today and unleash the full potential of your data!
0 notes
Text
Top Tips for Exporting Attachments from Salesforce Seamlessly
Efficiently exporting attachments from Salesforce is crucial for managing and transferring important files. This guide provides top tips to ensure a seamless export process. Start by familiarizing yourself with the different methods available, such as using Salesforce’s built-in tools or third-party applications. Utilize the Data Loader to handle bulk exports efficiently, and consider using the Salesforce Reports feature to filter and export specific attachments. Always verify your export settings to ensure that all relevant files are included and correctly formatted. For large volumes of attachments, split the export into smaller batches to prevent system overload. Additionally, regularly update your Salesforce instance to benefit from the latest features and security enhancements. By following these best practices, you can streamline your attachment exports, reduce errors, and improve overall efficiency. Whether you’re migrating data or archiving files, these tips will help you manage your Salesforce attachments with ease and confidence.
0 notes
Text
salesforce data loader
Salesforce Data Loader: A Comprehensive Guide
Introduction to Salesforce Data Loader
Salesforce Data Loader is a powerful tool that allows users to import, export, update, and delete large amounts of data in Salesforce quickly and efficiently. Whether you're migrating data from another system, performing regular data updates, or cleaning up your Salesforce instance, Data Loader is an essential tool for Salesforce administrators and developers.
Key Features of Salesforce Data Loader
Import Data: Data Loader enables users to import data into Salesforce from various sources, including CSV files, databases, and other Salesforce instances. It supports the import of standard and custom objects, making it flexible for different data migration scenarios.
Export Data: With Data Loader, users can extract data from Salesforce objects and export it to CSV files for analysis, reporting, or backup purposes. This feature is valuable for generating custom reports or integrating Salesforce data with external systems.
Update Records: Data Loader allows users to update existing records in Salesforce by matching them with unique identifiers such as record IDs or external IDs. This functionality is useful for mass updates, such as modifying contact information or updating opportunity stages.
Delete Records: Users can delete records from Salesforce using Data Loader, either individually or in bulk. This feature helps maintain data integrity by removing obsolete or redundant records from the system.
Schedule Jobs: Data Loader supports job scheduling, allowing users to automate data import and export tasks at specific times or intervals. Scheduled jobs ensure timely data updates and reduce manual effort for repetitive tasks.
Command-Line Interface (CLI): Data Loader offers a command-line interface for advanced users who prefer scripting or automation. The CLI provides additional flexibility and control over data operations, enabling users to execute tasks programmatically.
Getting Started with Salesforce Data Loader
To begin using Salesforce Data Loader, follow these steps:
Download and Install Data Loader: Visit the Salesforce website or AppExchange to download the Data Loader application. Follow the instructions to install the application on your computer.
Configure Data Loader Settings: Launch Data Loader and configure the settings as per your Salesforce instance requirements. You'll need to provide login credentials and specify connection parameters such as the Salesforce endpoint and API version.
Authenticate with Salesforce: Once the settings are configured, log in to your Salesforce account using Data Loader. You may need to authorize Data Loader to access your Salesforce data by providing the necessary permissions.
Select Operation (Import/Export/Update/Delete): Choose the data operation you want to perform—import, export, update, or delete records. Select the Salesforce object(s) you wish to work with and specify any additional settings or filters.
Prepare Data Source: Prepare your data source accordingly based on the selected operation. For imports, ensure your data is formatted correctly in CSV files with column headers matching Salesforce field names. For exports, specify the fields you want to retrieve and export data to CSV files.
Map Fields (Import/Update): If you're importing or updating records, map the fields from your data source to corresponding Salesforce fields. This mapping ensures that data is correctly matched and aligned during the operation.
Execute Operation: Once everything is set up, execute the data operation using Data Loader. Monitor the progress and review any error messages or logs generated during the process.
Verify Results: After the operation is completed, verify the results in Salesforce to ensure that data was imported, exported, updated, or deleted as expected. Check for any discrepancies or errors that may require further action.
Best Practices for Using Salesforce Data Loader
Understand Data Volume Limits: Familiarize yourself with Salesforce's data volume limits and governor limits to avoid hitting any restrictions during data operations. Batch your data into smaller chunks if necessary to stay within the limits.
Use External IDs for Record Matching: When updating records, consider using external IDs instead of Salesforce record IDs for matching. External IDs are custom fields that uniquely identify records and can simplify the update process, especially when integrating with external systems.
Enable Bulk API for Large Data Sets: For large-scale data operations, enable the Bulk API option in Data Loader settings. The Bulk API is optimized for handling large data volumes and can improve performance significantly compared to the standard SOAP API.
Schedule Jobs During Off-Peak Hours: If you're scheduling data jobs, choose off-peak hours to minimize impact on Salesforce performance and user experience. Avoid scheduling heavy data operations during peak usage times to prevent disruptions.
Backup Data Before Deletion: Before deleting records from Salesforce, make sure to back up the data to avoid accidental data loss. Export the records to CSV files or use Salesforce's data export functionality to create backups for archival purposes.
Monitor Error Logs and Retry Failed Records: Keep an eye on Data Loader error logs during data operations. If any records fail to process due to errors, review the logs to identify the cause and retry the failed records after addressing the issues.
Test in Sandbox Environment First: Before performing data operations in a production environment, test your processes and configurations in a Salesforce sandbox environment. Testing helps identify any potential issues or pitfalls before impacting live data.
Common Use Cases for Salesforce Data Loader
Data Migration: Migrate data from legacy systems or other CRM platforms to Salesforce during system implementations or migrations. Data Loader simplifies the process of importing large volumes of data while maintaining data quality.
Mass Updates: Perform mass updates on existing Salesforce records to correct errors, update information, or align data with changing business requirements. Data Loader streamlines the update process by enabling bulk updates across multiple records.
Data Extraction for Reporting: Export Salesforce data to external systems or reporting tools for in-depth analysis, visualization, or custom reporting. Data Loader allows users to extract specific datasets based on criteria and export them in CSV format for further analysis.
Cleanup and Deletion: Delete obsolete or redundant records from Salesforce to declutter the database and improve system performance. Data Loader facilitates bulk deletion of records based on specified criteria, such as inactive accounts or expired opportunities.
Integration with External Systems: Integrate Salesforce with external systems by importing data from external sources or exporting Salesforce data for use in other applications. Data Loader supports seamless data exchange between Salesforce and various third-party systems.
Conclusion
Salesforce Data Loader is a versatile tool that empowers users to manage data effectively within the Salesforce platform. Whether you're importing, exporting, updating, or deleting records, Data Loader offers robust features and flexibility to streamline data operations and maintain data integrity. By following best practices and leveraging Data Loader's capabilities, organizations can ensure smooth data management processes and derive maximum value from their Salesforce investments.
1 note
·
View note
Text
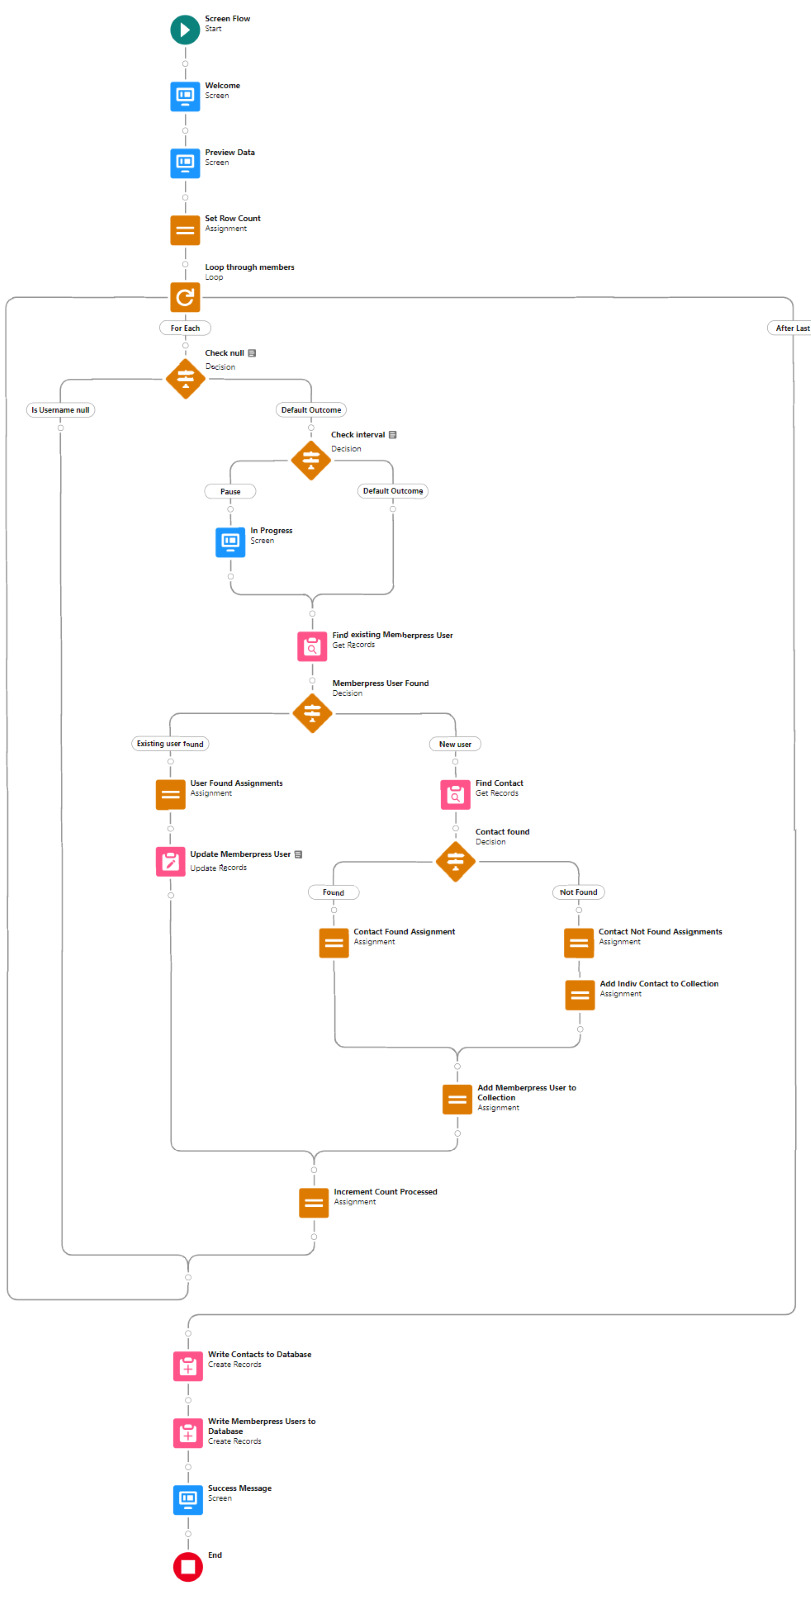
Enabling CSV data uploads via a Salesforce Screen Flow
This is a tutorial for how to build a Salesforce Screen Flow that leverages this CSV to records lightning web component to facilitate importing data from another system via an export-import process.
My colleague Molly Mangan developed the plan for deploying this to handle nonprofit organization CRM import operations, and she delegated a client buildout to me. I’ve built a few iterations since.
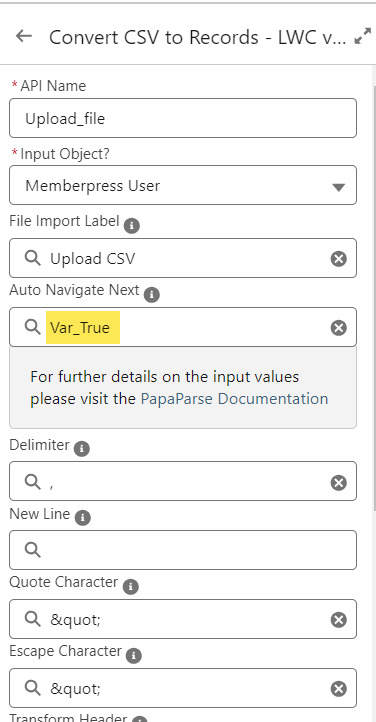
I prefer utilizing a custom object as the import target for this Flow. You can choose to upload data to any standard or custom object, but an important caveat with the upload LWC component is that the column headers in the uploaded CSV file have to match the API names of corresponding fields on the object. Using a custom object enables creating field names that exactly match what comes out of the upstream system. My goal is to enable a user process that requires zero edits, just simply download a file from one system and upload it to another.
The logic can be as sophisticated as you need. The following is a relatively simple example built to transfer data from Memberpress to Salesforce. It enables users to upload a list that the Flow then parses to find or create matching contacts.
Flow walkthrough
To build this Flow, you have to first install the UnofficialSF package and build your custom object.
The Welcome screen greets users with a simple interface inviting them to upload a file or view instructions.

Toggling on the instructions exposes a text block with a screenshot that illustrates where to click in Memberpress to download the member file.
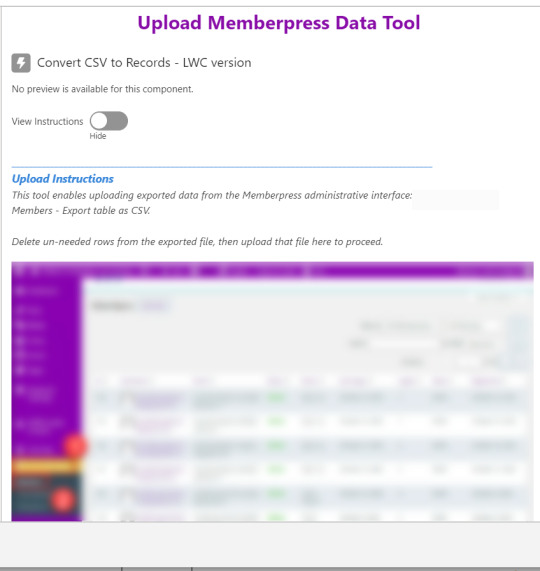
Note that the LWC component’s Auto Navigate Next option utilizes a Constant called Var_True, which is set to the Boolean value True. It’s a known issue that just typing in “True” doesn’t work here. With this setting enabled, a user is automatically advanced to the next screen upon uploading their file.
On the screen following the file upload, a Data Table component shows a preview of up to 1,500 records from the uploaded CSV file. After the user confirms that the data looks right, they click Next to continue.

Before entering the first loop, there’s an Assignment step to set the CountRows variable.

Here’s how the Flow looks so far..

With the CSV data now uploaded and confirmed, it’s time to start looping through the rows.
Because I’ve learned that a CSV file can sometimes unintentionally include some problematic blank rows, the first step after starting the loop is to check for a blank value in a required field. If username is null then the row is blank and it skips to the next row.

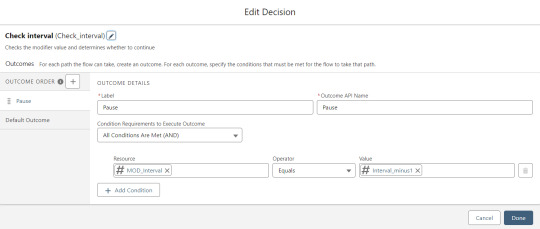
The next step is another decision which implements a neat trick that Molly devised. Each of our CSV rows will need to query the database and might need to write to the database, but the SOQL 100 governor limit seriously constrains how many can be processed at one time. Adding a pause to the Flow by displaying another screen to the user causes the transaction in progress to get committed and governor limits are reset. There’s a downside that your user will need to click Next to continue every 20 or 50 or so rows. It’s better than needing to instruct them to limit their upload size to no more than that number.

With those first two checks done, the Flow queries the Memberpress object looking for a matching User ID. If a match is found, the record has been uploaded before. The only possible change we’re worried about for existing records is the Memberships field, so that field gets updated on the record in the database. The Count_UsersFound variable is also incremented.

On the other side of the decision, if no Memberpress User record match is found then we go down the path of creating a new record, which starts with determining if there’s an existing Contact. A simple match on email address is queried, and Contact duplicate detection rules have been set to only Report (not Alert). If Alert is enabled and a duplicate matching rule gets triggered, then the Screen Flow will hit an error and stop.

If an existing Contact is found, then that Contact ID is written to the Related Contact field on the Memberpress User record and the Count_ContactsFound variable is incremented. If no Contact is found, then the Contact_Individual record variable is used to stage a new Contact record and the Count_ContactsNotFound variable is incremented.

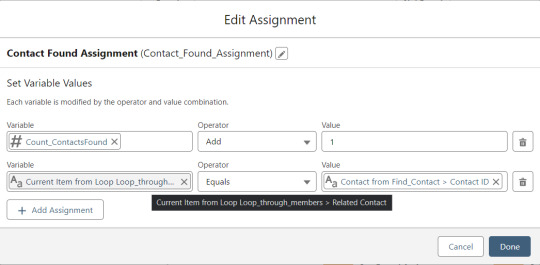

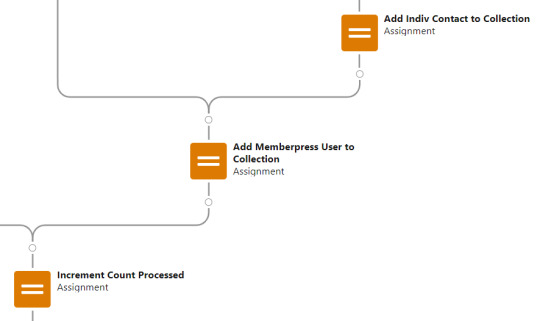
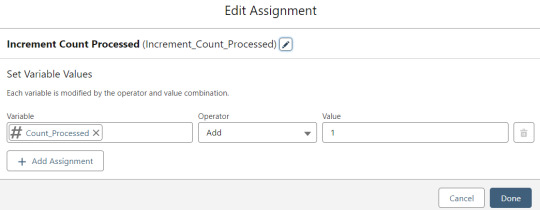
Contact_Individual is then added to the Contact_Collection record collection variable, the current Memberpress User record in the loop is added to the User_Collection record collection variable, and the Count_Processed variable is incremented.


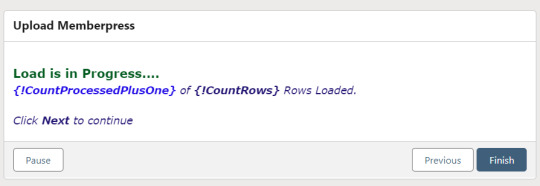
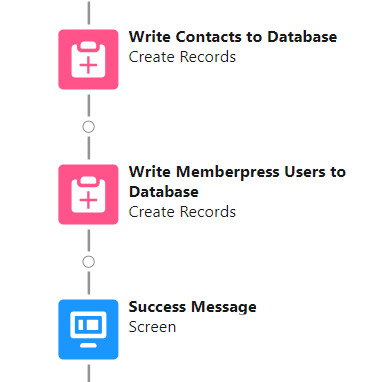
After the last uploaded row in the loop finishes, then the Flow is closed out by writing Contact_Collection and User_Collection to the database. Queueing up individuals into collections in this manner causes Salesforce to bulkify the write operations which helps avoid hitting governor limits. When the Flow is done, a success screen with some statistics is displayed.

The entire Flow looks like this:
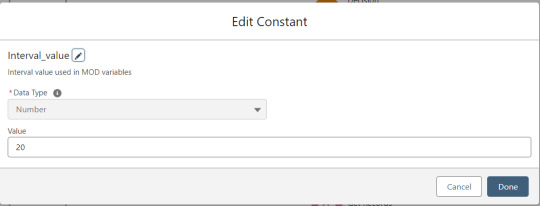
Flow variables
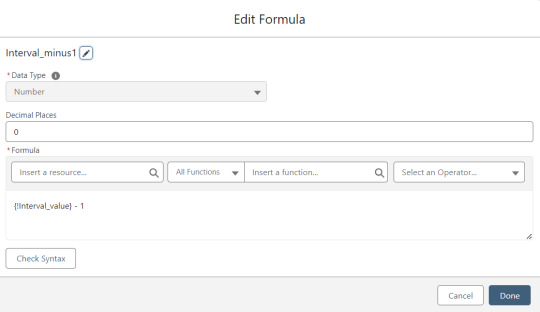
Interval_value determines the number of rows to process before pausing and prompting the user to click next to continue.
Interval_minus1 is Interval_value minus one.
MOD_Interval is the MOD function applied to Count_Processed and Interval_value.

The Count_Processed variable is set to start at -1.

Supporting Flows
Sometimes one Flow just isn’t enough. In this case there are three additional record triggered Flows configured on the Memberpress User object to supplement Screen Flow data import operations.
One triggers on new Memberpress User records only when the Related Contact field is blank. A limitation of the way the Screen Flow batches new records into collections before writing them to the database is that there’s no way to link a new contact to a new Memberpress User. So instead when a new Memberpress User record is created with no Related Contact set, this Flow kicks in to find the Contact by matching email address. This Flow’s trigger order is set to 10 so that it runs first.
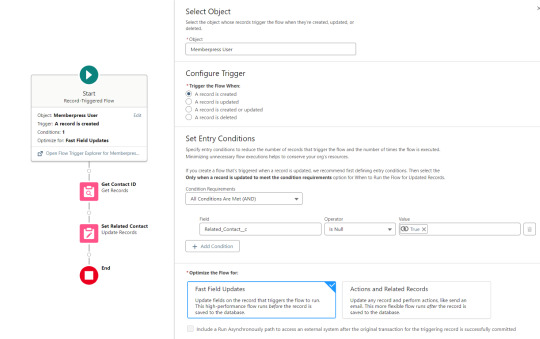
The next one triggers on any new Memberpress User record, reaching out to update the registration date and membership level fields on the Related Contact record

The last one triggers on updated Memberpress User records only when the memberships field has changed, reaching out to update the membership level field on the Related Contact record


0 notes
Text
Effortlessly migrate salesforce orgs in few clicks with BOFC
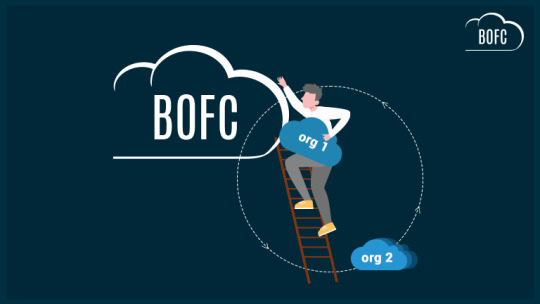
Salesforce Org migration is a tedious & time taking process that requires you to create, update, compare, export & import thousands of objects, fields & so on. Is the management of infinite metadata driving you crazy? But why go the Standard way when you can choose the smart one?
BOFC is the world’s no. 1 Salesforce application that empowers your Salesforce admins & developers with features like Cloning, Comparing, and Exporting & Importing Metadata. It saves your cost, time & efforts involved in Salesforce org migration by 90%.
Let’s explore how BOFC helps in Salesforce Org Migration.
1) Cloning Objects
Challenge: Every Salesforce object contains 100 fields and validation rules. Cloning each element can be tedious & time taking. And cloning many such objects is definitely not worth the time, especially when the same task can be done with 90% less effort & time. Solution: BOFC clones the complete Salesforce object along with its fields and validation rules in just one go. Also, you can clone multiple objects at once and get the work done in a few clicks.
2) Comparing Metadata
Challenge: During migration, you need to compare metadata between the 2 orgs and accordingly make decisions about whether to update, delete, or create new profiles, permission sets, objects, process builders & layouts. Consistently shuffling between multiple orgs for this purpose can hamper the analysis & decisions. Solution: BOFC has the feature of side-by-side comparison; this format presents the data of both orgs in one XLS sheet. You can get the most accurate idea of your existing metadata to make insightful decisions & create a fully optimized org.
3) Exporting & Importing Metadata
Challenge: You constantly need to move Salesforce metadata such as objects, fields, profiles, permission sets, validation rules, workflow rules, process builders, process flows & layout back & forth from one org to another during a Salesforce migration. This can be time consuming for Salesforce admins & developers, and can even result in data loss during the process.
Solution: BOFC helps you Export & Import your metadata in simple XLS format. Now, you can migrate it wherever you want quickly & easily.
4) Field Creation
Challenge: Creating one field in Salesforce is a 6-step process. And during migration, you need to create hundreds or even thousands of such fields. A task like this can take days. Solution: BOFC enables you to create countless fields in just a few minutes. With this application, you can simply drag & drop/upload your XLS file and click the create new fields button to complete the action. You can also select objects (standard/custom), page layouts, add/delete rows, assign permissions, and get the work done quickly & hassle-free.
Conclusion
BOFC has empowered global organizations by simplifying one of the biggest challenges in Salesforce migration, i.e., metadata management. All the above tasks can take days or even months and are nothing but monotonous. They do not require the expertise of a Salesforce admin or developer. BOFC serves as the best solution that enables cloning, comparing & exporting/importing, and creating BULK Salesforce metadata in just a few clicks.
So what are you waiting for now? Empower your Salesforce admins & developers with the benefits of BOFC and reduce your bulk work by many folds. For more details on each of these operations, you can check out the respective blogs or contact our friendly support who’d be more than happy to help.
0 notes
Text
Can I import data from my previous accounting software?
Sure, you can definitely import data from your previous accounting software! It's actually a pretty common practice when transitioning to a new system. Just make sure that your new accounting software supports the file format of your old data. Most accounting software will allow you to import data from a CSV file, which is a standard format that many other software can export to.
If you're not sure how to import your data, check out the documentation or support resources for your new accounting software. They should have step-by-step instructions on how to import data from other systems. And if you're still having trouble, don't hesitate to reach out to their support team for assistance.
By the way, if you're looking for a user-friendly Salesforce app for managing bills from multiple vendors, automating invoice data capture, and approvals based on vendor configurations, you should check out Quick Payable ! It's a great way to improve your financial management capabilities and optimize your spending. Plus, it's super easy to use!
Have a great day!
0 notes
Text
Streamlining Data Migration to Salesforce: Tips from the Experts
Data migration is a crucial step when implementing Salesforce in your organization. Whether you're transitioning from a legacy system or integrating data from multiple sources, ensuring the accuracy, completeness, and seamless transfer of data can be challenging. However, with proper planning and the right strategies, the migration process can be streamlined, saving time and reducing potential risks.
In this blog, we’ll explore expert tips to make your Salesforce data migration process smoother and more efficient.
1. Plan Ahead for a Smooth Transition
Successful data migration starts with careful planning. Before beginning the migration, take the time to:
Define Objectives: Clearly outline the goals for your Salesforce migration. This will guide your entire strategy, ensuring that data is aligned with business processes and that key stakeholders are on the same page.
Assess Current Data Quality: Before transferring data to Salesforce, assess its quality in your existing system. Clean and standardize your data to avoid importing duplicates or irrelevant information.
Establish a Timeline: Set realistic timelines for each stage of the migration process. Break it down into phases, such as data mapping, testing, and final deployment, ensuring that each phase is adequately accounted for.
2. Understand Salesforce Data Structure
Salesforce uses a different data model compared to traditional databases, so it’s vital to understand its structure:
Objects and Fields: Salesforce’s data model is based on objects (such as Accounts, Contacts, Opportunities) and fields. Familiarize yourself with how these objects work and which fields are required, custom, or optional.
Relationships Between Objects: Salesforce allows you to define relationships between objects, such as lookups or master-detail relationships. Knowing how these relationships work will help prevent data inconsistencies during the migration.
Data Types and Formats: Be mindful of how data types (such as text, dates, and numbers) are handled in Salesforce. Ensure that your data is mapped correctly to avoid issues later on.
Also Read : Major benefits of Salesforce implementation ?
3. Use the Right Tools for Data Migration
Several tools can assist in Salesforce data migration, each serving different needs. Some of the most popular include:
Salesforce Data Loader: A powerful tool for importing, exporting, updating, and deleting Salesforce data. It’s particularly useful for large datasets and complex operations.
Third-Party Tools: Tools like MuleSoft (which integrates seamlessly with Salesforce) and Informatica can be leveraged for more advanced migration scenarios.
Salesforce Data Import Wizard: A user-friendly tool suitable for smaller data migration projects. It allows for easy mapping of data from CSV files into Salesforce.
4. Test, Test, and Test Again
Testing is one of the most important steps in data migration. It ensures that everything is transferred correctly and that your Salesforce environment is functioning as expected. Here’s how to approach testing:
Test Data Migration in Stages: Begin by migrating a small subset of data. This will allow you to identify and fix issues early in the process.
Validate Data Integrity: After the initial migration, compare data in Salesforce with the original data source. Check for any discrepancies or missing information.
Conduct User Acceptance Testing (UAT): Have your end-users validate that the migrated data works correctly within their workflows. This will help identify any usability issues before full deployment.
5. Focus on Data Security and Privacy
Data migration often involves sensitive information, so maintaining data security and privacy is paramount:
Data Encryption: Ensure that data is encrypted both during transit and at rest to avoid unauthorized access.
Compliance with Regulations: Be aware of data privacy laws such as GDPR or CCPA, especially if you're handling customer or employee data. Salesforce provides various tools to help you maintain compliance during data migration.
6. Monitor the Migration Process
Once the data migration process begins, actively monitor progress to ensure everything is running smoothly:
Track Issues: If issues arise, address them immediately to avoid delays. Make sure to log any issues and document solutions to prevent them from happening in the future.
Ensure Performance: Monitor Salesforce’s performance during and after migration. Check for slowdowns or bottlenecks, which can affect the user experience and lead to inefficiencies.
7. Post-Migration Optimization
After the data has been successfully migrated, take steps to optimize Salesforce to ensure it works efficiently for your team:
Data Cleanup: Ongoing data maintenance is essential for keeping your Salesforce environment organized and accurate. Periodically clean up records, update data, and delete obsolete information.
User Training: Ensure that your team is properly trained to use Salesforce effectively with the newly migrated data. Provide support and ongoing education as needed.
Conclusion
Migrating data to Salesforce doesn’t have to be a daunting task. By planning ahead, understanding Salesforce’s data structure, using the right tools, and conducting thorough testing, you can ensure a smooth and successful migration. Additionally, focusing on data security, monitoring the process, and optimizing Salesforce after the migration will set your organization up for success in the long run.
With these expert tips in hand in London , your Salesforce implementation will be much more efficient, allowing your team to leverage the full potential of the platform.
#salesforce consultant in london#salesforce consulting in london#salesforce consulting partner in london#salesforce consultants in london#salesforce developer in london#Streamlining Data Migration to Salesforce: Tips from the Experts
0 notes
Text
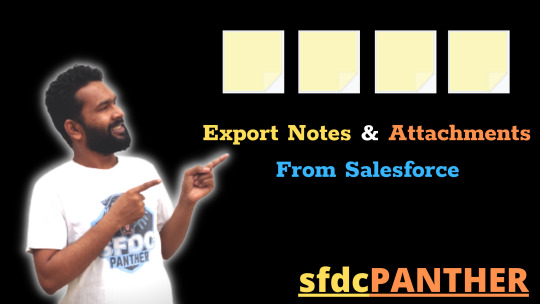
How to Export files & Attachment from Salesforce?
How to Export files & Attachment from Salesforce?
Hello #Trailblazers, In this video, we are going to learn how to export the Notes, Attachments, and Files from Salesforce Org to your Local machine. Why extract data from Salesforce? To backup your data.So you can integrate with a third-party system.You need the data in spreadsheet format for reporting purposes. Files in Salesforce Export Required Data To Export the data we need to follow…
View On WordPress
#export files from salesforce#export notes from salesforce#files in salesforce#how to export files#how to export files from salesforce#migrate attachments from salesforce#migrate files from one salesforce to another salesforce#migrate files from salesforce#Salesforce#salesforce files#Salesforce Lightning
0 notes
Text
lead management

Export your leads to excel, Aweber, salesforce. User can Import your Leads from different source system from excel file, Gmail, Yahoo, Aweber, Salesforce etc.
Claim Your Free Account Learn More
#lead#leadmanagement#lead magnets software#lead management system#bulk email marketing#email template#social media marketing#Social media
1 note
·
View note